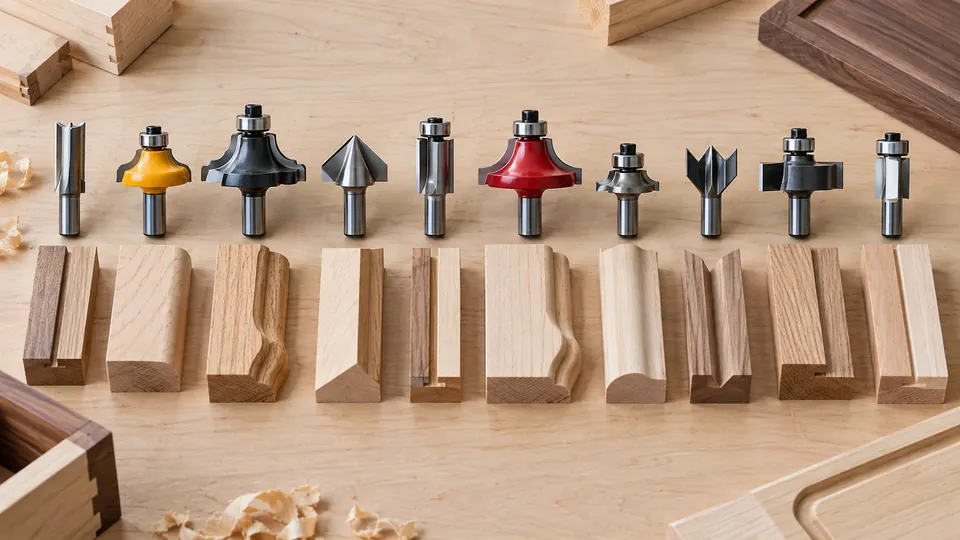
Router bits determine the shape, depth, and quality of a routed cut. A straight bit can cut grooves and dados, while a round-over bit shapes an edge and a flush-trim bit follows an existing template or surface. Understanding the types of router bits and their uses helps match the cutter to the material, router setup, and task.
Router bits vary by cutting profile, bearing position, spiral direction, diameter, cutting length, and shank size. A bit that is suitable for a handheld trim router may be unsuitable for a router table, and a large-diameter cutter may require a reduced speed or table-mounted operation. Always follow the bit manufacturer’s instructions for maximum RPM, mounting, and intended use.
Router Bit Types at a Glance
| Bit type | Primary use | Typical guidance method |
|---|---|---|
| Straight bit | Grooves, dados, mortises, rabbets, and recesses | Fence, edge guide, jig, or template |
| Spiral bit | Grooves, dados, mortises, and template routing | Fence, guide, or template |
| Flush-trim bit | Trimming one surface flush with another | Integrated bearing |
| Pattern bit | Following a template to reproduce a shape | Template and bearing |
| Rabbeting bit | Cutting a rabbet along an edge | Integrated bearing or fence |
| Round-over bit | Rounding an edge | Bearing or fence |
| Chamfer bit | Creating a straight angled edge | Bearing or fence |
| Dovetail bit | Sliding dovetails and dovetail joints | Jig, guide, or router table |
| Slot-cutting bit | Grooves and slots, including some panel joinery | Bearing, fence, or jig |
| Panel-raising bit | Shaping the raised field of a door panel | Router table |
Understanding Router Bit Construction
Cutting profile
The profile is the shape formed by the cutting edges. Straight bits have a cylindrical cutting edge, while edge-forming bits use curved, angled, or stepped profiles. The profile determines the visible shape of the cut, so the bit must match the joint or decorative detail being made.
Shank size
The shank is the smooth portion held by the router collet. Common woodworking sizes include 1/4-inch, 1/2-inch, and 8 mm in some markets and tool systems. Shank size is separate from cutting diameter. For example, a bit can have a 1/2-inch shank and a 1-inch cutting diameter.
A bit must match the collet fitted to the router. A 1/4-inch and 1/2-inch shank are not interchangeable, and an 8 mm shank is not automatically equivalent to either size. Use only a manufacturer-approved collet or accessory for the specific router. Never rely on an improvised sleeve or insert an undersized shank into a larger collet.
Cutting diameter and cutting length
Cutting diameter describes the width of the path made by the cutters. Cutting length describes how much of the bit can cut into the material. Neither measurement indicates the bit’s shank size or the router’s available plunge travel.
A longer cutting length can reach deeper into a workpiece, but it can also increase deflection and cutting forces. A deep cut may require multiple passes, secure workholding, and a router with suitable capacity. The bit manufacturer’s instructions take precedence over a general rule.
Bearings
A bearing-guided bit uses a small bearing to follow a workpiece edge or template. The bearing may be located above or below the cutters. Its position affects which surface the bit follows and how the template or workpiece must be arranged.
Bearings must turn freely and remain properly assembled. A flush-trim bit and a pattern bit can look similar, but their bearing locations and intended setups may differ. Identify the actual cutter design rather than relying on the name alone.
Straight Router Bits
Straight bits have cutting edges that run parallel to the shank. They are among the most versatile router bits and are available in several diameters and cutting lengths.
Common uses
- Cutting grooves across or along a board
- Routing dados for shelves and dividers
- Cutting shallow recesses
- Creating mortises with a suitable guide or jig
- Removing material inside a template
- Cutting rabbets when used with a fence or guide
A straight bit does not automatically produce a square, accurately positioned dado. The router needs a stable reference, such as an edge guide, fence, or dado jig. For a wide groove, several passes may be safer and easier to control than one aggressive cut.
Spiral Router Bits
Spiral bits use helical cutting edges that move around the bit. Their geometry can improve chip evacuation or surface-fiber control for particular operations, but each spiral direction has different behavior.
Upcut spiral bits
An upcut bit pulls chips upward toward the router. This can help clear chips from a deep groove or mortise. The upward cutting action may lift fibers or affect the top surface of plywood, laminate, or veneered panels, so support and feed technique remain important.
For sign-making and detailed lettering, explore our router bit picks for engraving letters to compare cutter profiles for the job.
Downcut spiral bits
A downcut bit pushes chips and fibers downward. It can help keep the top surface cleaner in some routing operations, but chip evacuation may be more difficult in a deep pocket or enclosed cut. Dust extraction and controlled cutting depth are especially relevant.
Compression bits
A compression bit combines upcut and downcut portions along its cutting length. The geometry is intended to manage fibers on both faces of suitable sheet material when the cutting depth engages the appropriate sections of the cutter. A compression bit may not perform as intended at every depth, so material thickness and manufacturer guidance matter.
Flush-Trim and Pattern Bits
Flush-trim bits
A flush-trim bit cuts one material flush with a nearby surface. The bearing follows the reference surface while the cutters remove the overhanging material. Typical uses include trimming laminate, matching an edge band, and copying a straight or curved outline.
Before routing, the waste should be supported and the template or reference surface should be firmly attached. The bearing must contact the intended surface throughout the cut. A loose template or unsupported overhang can cause an uneven edge or sudden tool movement.
For hardwood projects, compare our flush-trim router bit picks for hardwood to find a cutter suited to your template and material.
Pattern bits
A pattern bit follows a template to reproduce its outline in another workpiece. The bearing may be above the cutters, below them, or arranged as part of a specific template-routing setup. Template thickness and bearing placement determine how the workpiece and template are positioned.
Pattern routing is useful for making repeated parts, curved components, handles, and irregular shapes. The template should be rigid, accurately shaped, and secured so it cannot shift during the cut.
Rabbeting Bits
A rabbeting bit cuts a shoulder-shaped recess along an edge. Rabbets are commonly used for cabinet backs, drawer components, window or picture-frame details, and overlapping casework joints.
Many rabbeting bits use a bearing to control the width of the cut. Interchangeable bearings can change the rabbet width on some bit systems, but the permitted bearing sizes and assembly instructions vary. A fence can provide an alternative reference for a rabbeting operation when the bit and setup support that method.
Rabbets on end grain can be more prone to breakout. A backer board, suitable cutting sequence, and sharp bit can help support the fibers at the exit point.
Round-Over Bits
A round-over bit creates a convex radius on a straight or curved edge. Common applications include easing the edges of shelves, tabletops, handholds, and furniture components.
The bearing controls the bit’s position along the edge. A round-over bit can also be used without a bearing when a fence provides the reference, provided the router, fence, and bit are suitable for that configuration.
For a clean radius, keep the base flat on the workpiece and avoid stopping in the middle of a visible edge. Test the profile on scrap from the same material before routing the finished part. A small remaining flat at the edge may indicate that the bit radius does not match the material thickness or that the height is incorrectly set.
Chamfer Bits
A chamfer bit cuts a straight angled edge. Chamfers can remove a sharp corner, create a decorative bevel, or form a consistent angle on a component.
Bearing-guided chamfer bits are useful for edge work, while fence-guided setups can provide a reference on suitable router tables or handheld routing operations. The angle and width of the chamfer depend on the bit profile and height setting.
Chamfering end grain can produce breakout at the corner where two routed edges meet. Supporting the exit area and planning the routing sequence can reduce damage. A light final pass may also produce a cleaner intersection than one deep cut.
For angled edge profiles, see our guide to the best chamfer router bits and compare the available profiles and shank sizes.
Dovetail Bits
Dovetail bits create angled-sided grooves and pins for dovetail joints, sliding dovetails, and some decorative details. The bit’s angle, diameter, and cutting length must match the joint design and jig.
Through-dovetail and half-blind dovetail work generally requires a dedicated jig or carefully prepared template. A sliding dovetail may be cut with a straight guide, fence, or purpose-built jig, depending on the joint layout.
Dovetail cuts require accurate depth and lateral positioning. Test cuts help verify the fit before routing the actual joint. A joint that is too tight may split the receiving piece, while a loose joint will not provide the intended mechanical fit.
Slot-Cutting Bits
Slot-cutting bits make narrow grooves in an edge or face. They are used for splines, panel inserts, biscuits with suitable tooling, weatherstripping channels, and other joint or assembly details.
The cutter’s width and bearing position determine the slot location. Some slot-cutting systems use interchangeable bearings to alter the distance from the edge. Confirm that the cutter, bearing, and arbor assembly are rated for the router configuration.
Slot-cutting bits can create significant side force because the cutter engages the edge. Secure the workpiece and keep the router base fully supported throughout the cut.
Edge-Forming and Door-Making Bits
Ogee bits
An ogee bit creates a compound curved edge profile that can add a traditional decorative detail to furniture and trim. The profile is often more demanding to set up than a simple round-over because small height changes alter the appearance of the entire edge.
Beading bits
Beading bits create a rounded bead, sometimes with a separating shoulder or fillet. They are used for decorative edges, molding details, and furniture components.
To choose a profile for decorative edges and molding, explore our beading router bit recommendations.
Rail-and-stile bits
Rail-and-stile sets are made for frame-and-panel door construction. One cutter shapes the inside edge of the rails and stiles, while the matching cutter forms the panel or joint detail. The set must be used as a matched system, and the bit manufacturer’s setup instructions should be followed.
For frame-and-panel door projects, compare our rail-and-stile router bit set picks.
Panel-raising bits
Panel-raising bits shape the beveled or profiled edge of a solid-wood door panel. Their large diameter and cutting profile commonly require a router table, suitable workpiece support, and the speed limit specified by the manufacturer.
Large panel-raising cutters should not be treated like small handheld edge bits. Their mass, diameter, and cutting forces can exceed the intended capacity of a trim router or unsupported freehand setup.
Surfacing and Flattening Bits
Surfacing bits remove material across a broad area. They are used for flattening slabs, leveling workpieces in a sled, and cleaning up uneven panels when the router and setup are appropriate.
These bits require a stable jig, adequate support, and controlled depth adjustment. The bit must remain within its rated speed, and the workpiece must be secured against movement. A surfacing bit removes material over a wide path, so dust extraction and multiple shallow passes can be important.
A surfacing bit is not a replacement for a jointer or planer in every application. The finished surface may require additional sanding or other machining, especially when the setup allows minor ridges between passes.
For end-grain cutting boards specifically, see our router bit picks for flattening end-grain cutting boards.
Choosing a Bit for the Routing Task
Match the bit to the shape required, the material being cut, and the router configuration. The following sequence can help narrow the selection:
- Identify the finished shape or joint. A groove requires a straight or spiral bit, while a rounded edge requires a round-over bit.
- Check the material. Solid wood, plywood, MDF, laminate, and plastic can respond differently to the same cutter.
- Verify the shank and collet. The router must have the correct manufacturer-approved collet for the bit shank.
- Check the bit’s diameter, cutting length, and maximum RPM.
- Choose the guidance method. Use a fence, edge guide, bearing, template, guide bushing, or jig that suits the operation.
- Plan the cutting depth. Use multiple passes when the material removal or bit design calls for a gradual approach.
- Test the setup on scrap before routing the finished workpiece.
A guide bushing can follow a template without the router bit touching the template, but the bushing must fit the router base or adapter plate. Guide bushing diameter also affects the relationship between the template opening and the finished cut. Do not assume that a bushing from one router system fits another.
Router Bit Speed, Feed, and Cutting Direction
RPM describes how fast the router spindle turns. Feed rate describes how quickly the router or workpiece moves through the cut. These are different measurements, and cut quality depends on their interaction with bit diameter, cutter sharpness, material, cutting depth, and bit geometry.
Larger-diameter bits often require lower speeds than small bits. The bit manufacturer’s maximum RPM must never be exceeded. The router’s highest setting is not automatically suitable for every cutter.
For ordinary handheld routing around the outside of a workpiece, move the router so the bit cuts against its rotation and the router remains pressed toward the workpiece. The exact movement depends on whether the cut is on an outside edge or inside an opening. On a router table, the workpiece moves relative to the stationary bit, so the feed direction must be established from the table operator’s position and the cutter location.
Climb cutting reverses the usual relationship between cutter rotation and feed direction. It can pull the router or workpiece forward unexpectedly and create a loss-of-control hazard. It should not be used as a routine method for beginners or as a general solution for tear-out.
Safe Use of Router Bits
- Disconnect a corded router from power before changing bits or making adjustments. Remove the battery from a cordless router as directed by the manufacturer.
- Inspect the bit for a bent shank, damaged cutter, loose component, contaminated surface, or damaged bearing.
- Use the correct collet and follow the manufacturer’s bit insertion and tightening instructions.
- Keep the router base, guide, and workpiece stable throughout the cut.
- Secure the workpiece so it cannot shift. Do not hold a small workpiece close to an exposed cutter.
- Keep hands clear of the cutting path and use appropriate guards, fences, featherboards, push blocks, or starting pins where the setup calls for them.
- Wear eye protection and hearing protection. Use dust extraction and suitable respiratory protection for fine dust-producing materials such as MDF.
- Stop the router and disconnect power if abnormal vibration, bit slippage, unusual noise, or loss of control occurs.
A router table also requires secure router mounting, a properly seated insert plate, adequate cutter clearance, a stable fence, suitable guarding, and an accessible power switch. A router lift or insert plate must be verified for the exact router model and mounting arrangement. These components are not universally interchangeable.
Common Router Bit Problems
Burn marks
Burning can result from a dull or resin-coated bit, excessive friction, an unsuitable speed, an overly deep pass, or feed behavior that keeps the cutter in one area too long. Inspect the bit first, then review the speed, depth, material, and feed. Increasing or reducing speed without checking the complete setup may fail to address the cause.
Tear-out
Tear-out is affected by grain direction, bit sharpness, cutter geometry, material construction, workpiece support, and routing sequence. Plywood and veneered panels can require particular care because their surface fibers and core layers behave differently. A backer board, suitable spiral geometry, a lighter pass, and a planned direction may help, but no bit guarantees a perfect result in every material.
Vibration
Unexpected vibration can indicate an improperly installed bit, damaged or unbalanced tooling, a collet problem, unsuitable cutter size, insecure router-table mounting, or a mechanical fault. Stop the router, disconnect power, and inspect the bit, shank, collet, base, and mounting arrangement. Do not continue operating a router that vibrates abnormally.
Bit slippage
Bit slippage may result from incorrect shank and collet matching, contamination, inadequate tightening, or damage. Stop immediately, disconnect power, remove the bit safely, and inspect the components according to the router manufacturer’s instructions. Do not use shims, improvised sleeves, or damaged collets.
Maintaining Router Bits
Clean resin and dust buildup using a method approved for the bit’s coating, brazed assembly, and bearing. Protect the cutting edges and avoid chemicals that may damage the cutter or bearing. Physical damage, a bent shank, a cracked body, or a damaged bearing is a reason to remove the bit from service rather than attempt an unsupported repair.
Store bits so their cutting edges cannot strike other tools. Keeping profiles identified and shanks clean makes it easier to select the correct cutter and helps prevent installation problems. Before each use, inspect the bit and confirm that the bearing, if present, rotates freely.
Frequently Asked Questions
Can one router use every type of router bit?
No. The router must have the correct collet, sufficient capacity, and a suitable base or mounting arrangement. Some large-diameter cutters are intended for router-table use, while small trim routers may not support certain bits or operations.
Which bit is used for a dado?
A straight bit or suitable spiral bit can cut a dado. The bit should match the required width, and the router should be guided with a fence, edge guide, or dado jig. Wide dados may require multiple passes.
What bit trims laminate flush?
A flush-trim bit with a suitable bearing is commonly used. The bearing follows the substrate or template while the cutters remove the overhanging laminate. Secure the workpiece and confirm that the bearing contacts the intended reference surface.
Are 1/4-inch and 1/2-inch router bits interchangeable?
No. The shank must match the installed collet. A router designed for one shank size cannot safely accept another unless the manufacturer provides and approves a compatible collet for that model.
Should router bits be used at the router’s highest speed?
No. Speed depends on bit diameter, cutter design, material, router capability, and the manufacturer’s limit. Larger bits commonly require lower speeds, and the stated maximum RPM must not be exceeded.
The best router bit for a task is the cutter whose profile, size, bearing arrangement, shank, and cutting geometry match the operation. Confirm compatibility before installation, use a stable guide and supported workpiece, and make test cuts before committing to the finished material.
