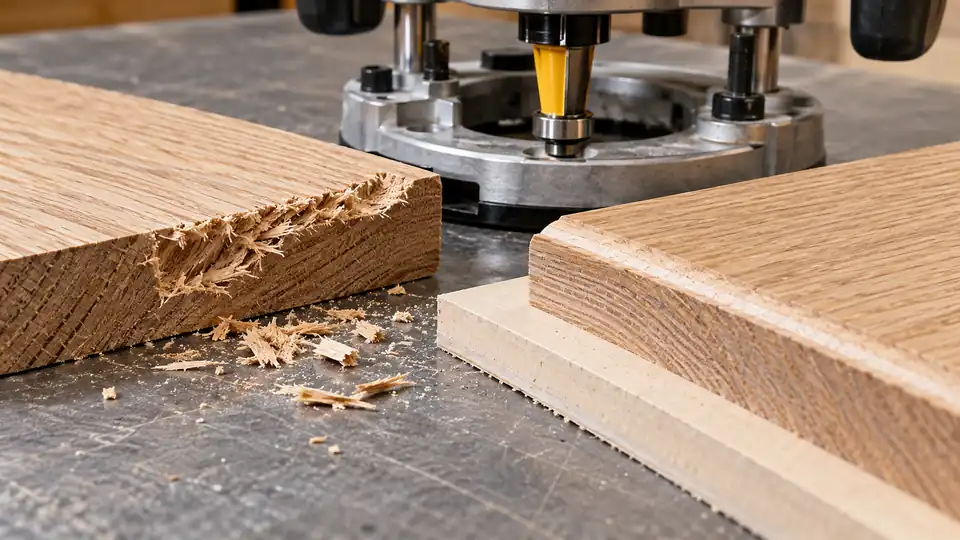
How to prevent tear-out when routing wood depends on controlling the wood fibers as the bit exits the cut. The most reliable approach combines the correct feed direction, a sharp and suitable bit, shallow passes, solid workpiece support, and a backing or sacrificial board where the cutter would otherwise break through an edge. No single bit or technique prevents tear-out in every species and routing operation.
What Causes Tear-Out During Routing?
Tear-out occurs when the router bit lifts or separates wood fibers instead of cutting them cleanly. The problem is most common where the grain changes direction, near the end of an edge, and where a bit exits the workpiece. A router spins rapidly, so an unsupported section of fiber can break away before the cutting edge severs it.
Several factors affect the result:
- Grain direction: Short or reversing grain is more likely to chip.
- Bit sharpness: Dull, dirty, or damaged cutters create more friction and tearing.
- Bit geometry: Straight, spiral, compression, and bearing-guided bits affect the way fibers are cut and supported.
- Cutting depth: Removing too much material in one pass increases cutting forces.
- Feed direction: An incorrect feed can pull the router into the workpiece or lift fibers.
- Workpiece support: Unsupported edges and exit points are especially vulnerable.
- Material construction: Plywood, figured hardwood, MDF, and veneered panels behave differently.
Use the Correct Feed Direction
For ordinary handheld routing, move the router so the rotating cutter works against the feed rather than pulling the tool forward. The router should resist your movement slightly, and the base should remain firmly supported against the workpiece or guide. Follow the operating instructions for the specific router and bit.
Do not rely on a universal clockwise or counterclockwise rule without identifying the viewing angle, the edge being routed, and whether the router is handheld or mounted in a table. The correct path changes with the routing configuration.
With a router table, the usual feed direction along a straight fence is from right to left when viewed from the operator’s position. This keeps the workpiece moving against the cutter’s rotation and helps the fence support the cut. Push the workpiece steadily while keeping it against the fence. A featherboard can provide additional pressure where appropriate, but it does not replace safe hand placement or proper guarding.
Why Climb Cutting Is Risky
Climb cutting feeds the workpiece in the same direction as the cutter’s surface movement. The bit can grab the material and pull the router or workpiece rapidly forward. This can cause loss of control and is not a routine solution for tear-out.
Some experienced woodworkers use a very small climb cut for a controlled cleanup at a tear-prone corner, but that technique requires a secure setup and strong control. It should not be used as a default method, especially with a handheld router, a small workpiece, or a large cutter. Conventional routing with proper support is the safer starting point.
Choose a Bit That Matches the Cut
Bit selection affects both tear-out and the amount of force required. Use a cutter intended for the profile and material rather than trying to solve every problem with feed speed alone.
| Routing situation | Useful bit characteristic | Important limitation |
|---|---|---|
| Straight dados or grooves | Sharp straight or spiral bit with the correct cutting length | Deep cuts may require several passes |
| Pattern or template routing | Flush-trim or pattern bit with the bearing in the correct position | The template and workpiece must be securely attached |
| Edge profiling | Sharp round-over, chamfer, or other edge-forming bit | End grain can still chip at the exit point |
| Veneered plywood and laminated panels | Bit geometry suited to the panel, such as an appropriate spiral or compression design | Cutting depth and material thickness affect the result |
Upcut spiral bits tend to evacuate chips effectively and can be useful for grooves and mortises, but their upward cutting action can lift fibers on the top surface. Downcut spirals press fibers downward and may leave a cleaner top face, but chip evacuation and plunge performance can differ. Compression bits combine cutting directions for suitable panel work, but they must engage the material at the depth intended by their design.
Inspect every bit before use. Do not use a cutter with a damaged edge, bent shank, damaged bearing, cracked component, or heavy resin buildup. Confirm that the shank matches the router collet. A 1/4-inch shank and a 1/2-inch shank are not interchangeable, and an 8 mm shank requires a compatible collet and router system.
Support the Fibers at the Exit Point
The point where the bit leaves the end of an edge is a common source of chip-out. The remaining fibers have little support, so the cutter can break them away. A sacrificial board gives those fibers something to press against.
Use a Backing Board
Clamp a scrap board tightly against the edge where the cutter will exit. The backing piece should be flat, stable, and aligned with the workpiece surface. Route through the main workpiece and slightly into the scrap. The sacrificial board supports the fibers at the far edge and contains the breakout.
This method works well for cross-grain cuts, stopped profiles, and cuts that run across the end of a board. Make sure the clamp, backing board, and workpiece leave enough clearance for the router base and bit.
Route the End Grain First
For a profile that runs around all four sides of a board, routing the end-grain edges first can reduce visible chip-out. The subsequent long-grain passes then remove the small damaged area left at the end of the earlier cuts.
A common sequence is:
- Secure the board with its face supported and the edge accessible.
- Route the end-grain edge at one end.
- Route the opposite end-grain edge.
- Complete the long-grain edges.
- Inspect the corners and make a light cleanup pass only if needed.
This sequence does not eliminate all tear-out. Grain direction, species, profile size, and bit sharpness still affect the result.
Make Shallow, Controlled Passes
Large cuts should usually be divided into multiple passes. Removing less material per pass reduces the load on the bit and gives the cutter a better chance to sever fibers cleanly. The correct depth depends on the bit, router, material, workpiece support, and operation. The manufacturer’s instructions take precedence over a universal depth recommendation.
Set the depth so the router base remains stable throughout the cut. A plunge router can use a depth stop or staged adjustments, while a fixed-base router requires secure height adjustment before routing. Do not confuse the router’s available plunge travel with a safe single-pass cutting depth.
Keep each pass smooth and continuous. Forcing the router can cause chatter and tear-out. Feeding excessively slowly can create friction and burning, while pushing too quickly can overload the cutter and reduce control. Adjust the feed based on the sound of the cut, resistance, surface quality, and the material being machined.
Prepare the Workpiece and Router
Good preparation prevents many tear-out problems before the router starts.
- Flatten or stabilize the workpiece so the router base cannot rock.
- Remove loose material, dirt, and finish buildup near the cut.
- Mark the cut and identify the grain direction on each edge.
- Clamp the workpiece securely, with enough support near the routing area.
- Use a fence, edge guide, template, or bearing as appropriate for the operation.
- Check that the bit is fully supported by the correct collet and installed according to the router manual.
- Set the speed within the bit manufacturer’s limit. Larger-diameter bits may require lower RPM.
- Confirm that the bit does not contact the base, guide, clamps, or table insert.
Disconnect the router from power before changing the bit or making adjustments. For cordless models, remove the battery according to the manufacturer’s instructions. Wear eye and hearing protection, and use effective dust extraction. MDF and some plywood products can create substantial fine dust, so follow the material and tool safety guidance as well.
Material-Specific Ways to Reduce Tear-Out
Hardwood
Hardwood with reversing, interlocked, or figured grain can tear even with a sharp bit. Reduce the amount removed per pass, support the exit edge, and test the setup on scrap from the same board. A light final pass may improve the surface, but it cannot correct severe fiber damage created by an earlier deep cut.
Softwood
Softwood can compress under the router base and may have weak areas around knots or earlywood. Keep the base flat and the feed steady. Inspect for knots, splits, and unstable sections before routing.
Plywood and Veneered Panels
Plywood faces can chip at the veneer, while the plies along an edge may separate. Use a sharp bit suited to panel work, support the exit edge, and test on an offcut from the same sheet. A compression bit may help with suitable through-cuts when its geometry is engaged at the intended depth, but it is not a universal cure for every plywood cut.
MDF and Particleboard
These materials often produce a comparatively uniform cut, but their edges can crumble and their dust can be heavy. Keep the workpiece supported and use dust extraction. Seal or finish the edge after routing if the project requires it.
What to Check If Tear-Out Continues
Stop the router and inspect the setup rather than repeatedly changing feed speed at random. Work through the simple, observable causes first:
- Check the bit for dullness, resin, damage, or a loose bearing.
- Confirm that the bit is appropriate for the profile and material.
- Verify the shank, collet, and installation procedure.
- Look for movement in the workpiece, guide, template, fence, or router base.
- Check whether the cut is entering or exiting across unsupported grain.
- Reduce the depth per pass if the cutter is removing substantial material.
- Review the feed direction for the exact handheld or router-table configuration.
- Inspect for abnormal vibration, which may indicate a damaged bit, collet problem, unsuitable cutter, or router fault.
Do not continue operating a router that vibrates unusually, makes a new grinding sound, or allows the bit to slip. Disconnect power and inspect the tool. Manufacturer support or qualified service may be appropriate if the cause is not visible.
Can Sanding Fix Router Tear-Out?
Light sanding can remove minor fuzzing or soften a small edge defect. It should not be treated as a replacement for correct routing technique. Deep tear-out can change the profile, reduce a part’s dimensions, and remain visible after finishing. Preventing the damage with support, a suitable bit, and controlled passes is more reliable than trying to remove it afterward.
Frequently Asked Questions
Does a sharper router bit prevent all tear-out?
No. A sharp bit cuts more cleanly and usually reduces unnecessary tearing, but grain direction, unsupported edges, bit geometry, cutting depth, and material construction still affect the result.
Should I route faster to prevent tear-out?
There is no universal feed speed that works for every router, bit, and material. Feed smoothly at a rate that keeps the cutter cutting rather than rubbing or being forced. Excessive speed can overload the bit, while an excessively slow feed can contribute to burning.
Can I use climb cutting to stop tear-out?
Climb cutting can reduce a small amount of localized breakout in specialized, controlled work, but it also creates a strong self-feeding tendency. It is not the standard solution for tear-out and should not be used casually with a handheld router.
Which router bit is best for tear-out?
No single bit is best for every cut. A sharp spiral or compression bit may suit certain grooves or panel cuts, while a properly selected profile bit is appropriate for edge shaping. Choose based on the operation, material, required cutting depth, and the bit manufacturer’s guidance.
Preventing tear-out starts with identifying where the wood fibers are least supported. Use conventional feed direction, secure the workpiece, support the exit edge, select a sharp compatible bit, and remove material in controlled passes. These measures address the cause of most tear-out without relying on an unsafe feed direction or an unsupported cutter.
